Hand-beveling the edges of woodcraft can be challenging and time-consuming. Whether you’re operating or trimming around a specific building project, using a miter saw can significantly simplify your work. But what exactly is a miter saw? It’s a carpenter’s tool designed for woodworking purposes, cutting pieces to rough length before refining them with more precise machines.
While there are various miter saws available on the market, the quality of your work will depend more on the miter saw table than the saw itself, regardless of how much you spend. Many pre-set miter stands are available for purchase, but they can be expensive and lack the versatility of a homemade miter saw table. Creating your own table is a cost-effective option, as you can make one for around $50 or $60 worth of materials.
What is the use of miter saw table?
A miter saw table serves as a supportive and stable work surface specifically designed to enhance the functionality and safety of a miter saw. Miter saws are power tools commonly used in woodworking and carpentry to make accurate crosscuts and miter cuts at various angles. The miter saw table complements the miter saw by providing the following benefits:
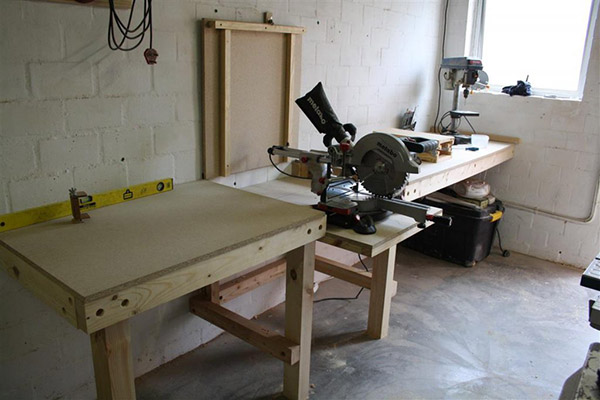
- Support for Long Boards: Miter saws are typically designed with a small base, which can limit the stability and support for cutting long boards. The miter saw table offers a larger surface area, allowing users to work with longer pieces of wood more efficiently and safely.
- Accurate Cuts: The flat and even surface of the miter saw table ensures that the workpiece is well-supported and positioned correctly for precise and accurate cuts. This stability is crucial for achieving clean and precise miter cuts and crosscuts.
- Safety: The miter saw table provides a secure and stable platform for the miter saw, reducing the risk of accidents and injuries associated with working on unstable surfaces.
- Versatility: The table allows the miter saw to be positioned at different angles and heights, making it easier to work on various projects with different cutting requirements.
- Workbench Functionality: Apart from serving as a support for the miter saw, the table can double as a workbench, offering additional space for other woodworking tasks and projects.
- Organization: Some miter saw tables come with built-in compartments and storage areas to keep tools, accessories, and materials organized, further improving the efficiency of the workspace.
- Efficiency and Productivity: With the help of a miter saw table, woodworkers can work more efficiently and productively, as it streamlines the cutting process and minimizes the time spent adjusting and repositioning the workpiece.
Overall, a miter saw table enhances the performance and usability of the miter saw, making it an essential accessory for woodworking enthusiasts and professionals who regularly use miter saws for their projects.
Steps on building your own homemade miter saw table
To build your own miter saw table, you will need the following materials and tools:
Materials:
– Clamps
– Miter saw, circular saw, table saw
– Tape measure
– Cordless drill
– Level
– Drill bit set
– Socket/ratchet set
– Framing square
– Safety glasses
– 4 x 8 plywood
– 1 x 6 x 10 wood board
– 2 or 3 2 x 4 x 8 wood studs
– 4 hanger bolts and nuts (choose the size that fits your miter saw)
– Nails or screws for fastening
Steps to Build Your Miter Saw Table:
1. Measure the Miter Saw:
Measure the height, width, and depth of your miter saw. The width should match the entire width of the saw, while the depth is the boundary of the table. Ensure that the depth is sufficient for the saw to sit securely on the table. To measure the height, place the miter saw on a flat, hard, level surface and measure from the base to the miter saw. Determine the height of the dividers by subtracting twice the thickness of the plywood or directly measure its height using a piece of scrap material.
2. Cut the Plywood:
Cut an 18″ strip and a 17.75″ strip from the plywood for the bottom and top of the table. Also, cut the back to match the height of the miter saw, taking into account the thickness of the bottom. Next, cut the top piece of plywood (the shorter one) to create a spot for your miter saw. Use a panel or circular saw, depending on the width of your plywood.
3. Create the Dividers
Cut the 1 x 6 wood to match the height of the miter saw, considering the bottom and top of the table. Measure the same width as the top of the table and create a stop block by clamping a piece of scrap wood. This stop block will allow you to cut 6 dividers precisely and evenly.
4. Assemble the Table:
Ensure that all pieces are at the correct height before nailing or screwing anything together. Once you have verified the measurements, assemble the pieces to achieve your desired miter saw table output.
By following these steps and using the listed materials and tools, you can successfully build your own functional and sturdy miter saw table to enhance your woodworking projects and improve the accuracy of your cuts.
Safety precautions upon using miter saw.
Using a miter saw requires strict adherence to safety precautions to prevent accidents and injuries. Here are some essential safety measures to follow when operating a miter saw:
- Read the Manual: Before using the miter saw, thoroughly read and understand the manufacturer’s manual. Familiarize yourself with the saw’s features, controls, and safety guidelines.
- Personal Protective Equipment (PPE): Always wear appropriate personal protective equipment, including safety glasses or goggles to protect your eyes from flying debris, hearing protection, and dust masks if necessary.
- Maintain a Clear Work Area: Keep the work area clean and free from clutter. Remove any tools, materials, or debris that could interfere with the saw’s operation.
- Stabilize the Saw: Ensure the miter saw is placed on a sturdy and level surface. Use a stable workbench or stand designed for the miter saw’s size and weight.
- Secure the Workpiece: Always secure the workpiece firmly against the saw’s fence and table before making any cuts. Use clamps or other appropriate holding devices to prevent movement during cutting.
- Check Blade and Saw Guard: Inspect the saw blade before use to ensure it is sharp, clean, and properly installed. Ensure that the saw guard is in good condition and functioning correctly. The guard should cover the blade entirely when not in use.
- Keep Hands Clear: Keep your hands clear of the blade path at all times. Do not reach over or behind the blade while it is spinning or coming to a stop.
- Use Two Hands: Use both hands to operate the miter saw. Keep one hand on the handle and the other on the trigger or switch.
- Wait for Blade to Stop: Allow the blade to come to a complete stop before removing the workpiece or making any adjustments to the saw.
- Avoid Loose Clothing and Jewelry: Wear appropriate clothing and avoid wearing loose-fitting clothes or jewelry that could get caught in the saw.
- Stay Focused: Avoid distractions while using the miter saw. Stay focused on the task at hand and keep bystanders at a safe distance.
- Do Not Force the Cut: Let the saw blade do the cutting. Avoid forcing the workpiece through the blade, as this can lead to kickback and other dangerous situations.
- Use Proper Cutting Techniques: Follow the correct cutting techniques for different types of cuts, such as crosscuts and miter cuts. Keep the saw at a steady pace and avoid sudden movements.
By following these safety precautions, you can significantly reduce the risk of accidents and injuries while using a miter saw and ensure a safer and more productive woodworking experience. Always prioritize safety and take the time to properly set up and operate the miter saw to protect yourself and others in the workspace.
- Related post: Top 5 Best Sliding Compound Miter Saw Reviews